Friday, 12 September 2025

Cat Grass Jar for Cats


Instructions

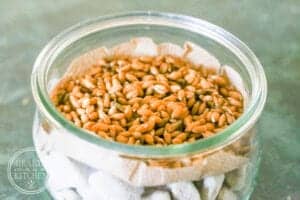
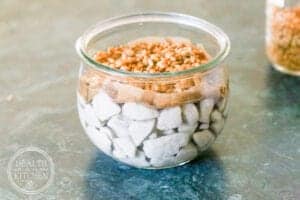
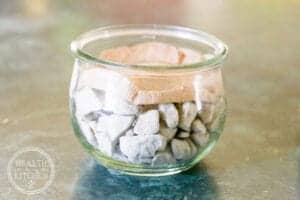
  • Fill your jar 2/3 of the way full with grow stones and cover with unbleached paper towel or a coffee filter
    How to Grow Cat Grass {without dirt}
  • add cat grass seeds on top
    How to Grow Cat Grass {without dirt}
  • fill with water to the bottom of the paper towel
    How to Grow Cat Grass {without dirt}
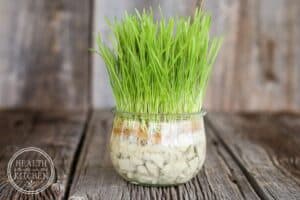
  • Keep in indirect light for 7-10 days or until ready to let your cat enjoy!
    How to Grow Cat Grass {without dirt}

Wednesday, 21 December 2022

Cleaning a cutting board

Cleaning A Wood Cutting Board With Kosher Salt And Lemon

The best way to maintain your wood cutting board is to give it a good cleaning every month with kosher salt and lemon.

Take a lemon and cut it in half. Sprinkle the board with coarse salt and use the lemon to scrub the salt down each side of the board. Let the solution sit for about five minutes before cleaning the board off with a sponge.


Monday, 5 September 2022

Keep fruit fresh for longer

Store fruit like berries and grapes in glass jars in the fridge. They will last much longer.


Tuesday, 5 July 2022

Scented Loo rolls

 Put some essential oils scent in your loo roll.


Wednesday, 1 June 2022

Unclog your toilet


To use dish soap to unclog any blockages in your toilet, simply pour one cup of your preferred brand of dish soap directly into the bowl. After the soap has sat in the bowl for 15 minutes, pour a bucket of hot water from waist height into the toilet bowl to clear it out.

Fixing Tear in Screen Door


A quick, easy, and cheap aid for helping you repair these problems is using clear nail polish. By adding a few drops of clear nail polish to the tear in the screen, it'll act as an invisible glue and gets your screen back to perfect functionality.

Saturday, 13 November 2021

Coconut bowls

1. Pick an unblemished coconut shell with no noticeable cracks. The beautiful thing about using a coconut shell to make a bowl is that you can make a bowl of any size. For a smaller bowl, simply pick a smaller coconut. For a larger bowl, grab a bigger one.

If there are cracks, they’ll just get larger and more pronounced as you smooth and sand the shell.

2. Drain the liquid from the coconut and split it in half. Grab a bowl, a cutting board, a hammer, and a screwdriver. Tap the screwdriver through the eyes of the coconut and drain the liquid into the bowl. 

Then, strike the coconut with the hammer all the way around its hemisphere until a crack starts to form. Keep hammering the coconut until the crack is large enough for you to pull the coconut apart.


3. Pry the coconut meat away from the shell so the inside is smooth. 

This sounds harder than it is! Wedge a butter knife between the shell and the coconut meat and wiggle it back and forth until the meat begins to come away from the shell. It might take a while to do the entire coconut, but it’s an essential part of the process.

Be careful while doing this. Try holding the coconut shell in your non-dominant hand so you can wield the butter knife with more control.

4. Remove the fibrous exterior of the coconut with 80-grit sandpaper. 

If possible, attach a sanding flap wheel to a drill to make the process go faster—it can take quite a while to sand the shell down by hand. Make sure to wear a dust mask and gloves while you work! If you don’t have a drill and sanding flap wheel, a few other alternatives are listed below for you:

  • Use a hand sander to protect your hands from the sandpaper’s grit.
  • Rub the exterior of the shell with steel wool if you don’t have sandpaper.
  • Use a lathe and sanding attachment for an even quicker process.

5. Sand the exterior of the shell by hand to a smooth finish. Hold the shell in a gloved hand so that if the sandpaper slips, it won’t rough up your skin. Since you already used 80-grit sandpaper, move on to something higher, like 100-grit for the first pass-over. Continue using finer and finer grits of sandpaper until ending at 240-grit.

For example, you could go from 100-grit to 120-grit to 240-grit.

The goal is to expose the smooth, polished shell beneath the fibrous exterior.

6. Rub the edge of the shell over 40-grit sandpaper to even it out. The edge of your coconut shell might not be completely even and might have a few jagged sections. Place a piece of 40-grit sandpaper on your workstation, place the shell cut-side-down on it, and rub it back and forth until the edge is smooth to the touch.

This process makes your bowls look much more professional and polished once they’re done.

7. Sketch your design on the outside of the shell so it’s easy to follow. You can always freestyle your carvings, but if you want something intricate, it’s best to follow an outline. Use a pencil or pen—basically anything that will be visible without permanently marring the shell's surface.[12] You could also print a design on paper and tape it to the outside of the shell. If you do this, take a precision knife and cut the paper away in the spots you want the shell carved. In this way, you make your own stencil.

Keep in mind that coconut shells are really thin. You may not be able to carve it the same way you might traditionally carve a piece of wood.

Think about using small holes to create different designs, like swirls, geometric patterns, or even faces or words.

8. Use a power drill or dremel to carve your bowl’s design. With a dremel, you can usually carve a design into the shell without going all the way through. Just be conscious of how deep you’re carving, so you don’t accidentally break through. Use a small bit on a drill to make delicate holes through the shell.

9. Add decorative elements to the edge of the shells with a file. For example, file a “V” shape into the edge of the shell every 2 to 3 inches (5.1 to 7.6 cm) to resemble flower petals.[15] You can use flat, rounded, circular, or triangular files on a coconut shell. Be careful working with metal files. They can be very sharp!


10. Paint your bowls with acrylic paint if you want to add color to them. Acrylic paint is an excellent choice for coconut shells because it dries quickly.

11. Polish your carved bowls with beeswax for a natural shine. Put a little beeswax on a clean rag and rub it all over the shell. Reapply wax to the rag when it gets dry, and continue buffing the shell until it has an even shine all over. You can reapply beeswax as needed to keep your carved shell looking nice.


12. Apply a coat of varnish if you want your bowls to have a glossy finish. Use a clear varnish if you want the shell’s color to shine through, or use a colored varnish for a deeper shine. Let the varnish dry completely before moving the shell. If the shell is to hold food or drink, don’t apply varnish or wax on the inside. Do this step in a well-ventilated area. Varnish can produce some pretty strong fumes!

Dry your bowls in the sun until they’re no longer tacky. The heat from the sun will help the wax or varnish dry faster. Once the bowls are no longer sticky or tacky to the touch, you can move them.

Sunday, 7 February 2021

Rainbow Candle


What you will need:

• 30cl glass

• Wick and wick stick um

• Wick centering tool

• Kerasoy container wax

• Chip or liquid dye in 5 colours

• Aluminium wax scoop

• Digital kitchen scales

• Digital LCD Thermometer

• Pouring jug

• Pan and glass bowl or double boiler

Tip!

A 30 cl glass will hold around 220g of wax, split this between your 5 colours, that will be around 44 grams of wax per colour layer.

Steps to success:

1. Get yourself a 30 cl glass and ensure that it’s clean and dry before use

2. Add your wick to the bottom of the glass using a wick stick um to secure it in place

3. Using the double boiler method to melt your wax, fill your pan around halfway with boiling water and place on a hob or hotplate

4. Using your aluminium scoop and digital scales, weigh out 44 grams of wax and place into a glass bowl

5. Place your bowl of wax on top of your pan and add a thermometer to measure the temperature of the wax as it heats

6. Keep your pan on a medium to low heat and remember to not let your wax exceed 80°C 

7. Once your wax is melted, add your chosen colour, you can use chip or liquid dye

8. Add a few droplets liquid dye or a small sprinkle of dye chips and mix gently until the colour has spread evenly, feel free to add more drops or chips if you want a stronger colour

9. Transfer your melted wax into your pouring jug

10. Slowly and gently pour your wax into your candle glass to create your first layer

11. Use a wick centering tool to secure the wick and ensure it is suspended tight and upright 

12. Leave the candle to set for 1 – 2 hours before pouring in your next colour

13. Repeat for each colour until you reach 1cm from the top of your glass

14. Save any left-over wax to repeat your pour if you get sinkholes on your last layer

15. Let your candle set completely

16. Trim your wick to size

Source: Supplies for candles

Tuesday, 27 October 2020

Grow a forrest

1. Go to the woods. Bring a cone.🌲🌲🌲

2. Put the cone in a pot - so that most of it stands out.

3. Pour it every day with a small amount of water, as excess water makes the cones rot.

4. After some time, a tiny tree will appear.

5. Congratulations - they just started oxygen production and you have a piece of forest in your own home.🍁🍂🍃.

Saturday, 6 June 2020

Pick coriander leafs easily


STICK THE STEMS OF THE CORIANDER THROUGH A COLANDER

PULL THE STEM OUT. THE LEAFS WILL STAY BEHIND


Easy eating a pineapple


CUT THE TOP OFF AND PEEL ONE SEGMENT OFF


PLACE A PLASTIC FOOD BAG OR CLING FILM OVER IT TO KEEP FRESH


Peel eggs easy


PLACE HARD BOILED EGGS INTO A CONTAINER

POUR COLD WATER OVER THE EGGS

CLOSE THE LID

SHAKE IT HARD FOR A BIT

PEEL IT OFF


Sunday, 24 May 2020

Grow a Pineapple

GROW A PINEAPPLE


Rather than chucking the head of your pineapple in the compost bin, did you know you can grow a pineapple plant instead? This great tip not only reduces your food waste, but gives you something exciting and tropical to grow.
1. Use toothpicks to suspend the pineapple head over a large glass jar filled with water and place in direct sunlight inside your home.
2. Change the water every couple of days, making sure it’s touching the base of the pineapple head.
3. You should notice some root growth after the first week. Once this happens, plant the head in a pot of compost and place it in a sunny spot. Water once a week.

Bird House Milk Carton

BIRD HOUSE MILK CARTON

Needed:

  • Good scissors
  • Old newspaper
  • A towel
  • Environmentally friendly paints Paper or card
  • A straight(ish) stick String
  • Bird food

Method:

1. Wash the carton and dry it out by leaving it upside down for an hour. Lay a towel on the floor and gather all of the listed items.
2. With a pair of good scissors, cut windows on either side of the carton – any shape or size you fancy. Then cut a hole at the bottom on both sides – big enough to poke a stick through. This is a ledge for the birds.
3. Paint your birdhouse and leave it
to dry on newspaper. Then give it
a second coat. Drying times will depend on the type of paint you use.
4. It’s time to decorate your birdhouse. Be as creative as you like.
5. Once dry, use the scissors to poke a hole through the top. Then use string to create a loop so you can hang your birdhouse. Don’t forget to put some bird food inside to encourage the birds!

Lettuce

GROW LETTUCE

 Grow lettuce, celery or cabbage in five simple steps
1. Place any leftover vegetable hearts in glass jars with a little water at the bottom.
2. Keep the jar in a sunny spot, like a south-facing windowsill.
3. After five days you will notice roots beginning to appear along with new leaves.
4. When this happens, plant the vegetable heart in some soil.
5. Watch it grow until it looks big enough to eat. Yum!

Grow Potatoes

Grow potatoes


1. Leave a couple of potatoes in a dark cupboard for several days to encourage sprouting.
2. Once the potato is covered in sproutings, cut them off in chunks, allowing at least three sproutings per chunk.
3. Lay them on some kitchen towel, and leave to dry overnight.
4. If you have a garden, plant the potato skin 4 inches deep into the soil with the sproutings facing up.
If not, plant them into a bag for life filled with soil and watch them grow!

Friday, 3 April 2020

memory plaques


500g plain flour
250g salt 
250 ml water 
Mix into a dough 
Roll out then press handprints 
Bake in oven on lowest temp for 3-4 hours 
Paint then varnish to seal

Monday, 23 March 2020

Flowerpots Lighthouse

LIGHTHOUSE

Supplies:

  • candle or solar lantern
  • clay pots (various sizes that stack)
  • primer spray paint
  • outdoor craft paint (I used Patio Paint brand)
  • ruler
  • pencil
  • paint brush
  • E6000 glue (or similar) (solar light would be ideal)

Steps:

1. Spray the clay pots with multiple layers of primer. Add layers and allow to dry according to primer instructions. Spray them in a well ventilated area.

2. Stack the pots and use a pencil to mark where they overlap. Now you have the area that will show when they are stacked.

3. Divide the exposed area into equal sections for the painted stripes. Use a ruler to make marks all the way around the pot, then connect the marks so that you have a guide line for painting.

4. Paint the red areas, allowing to dry in between coats. Apply paint until you have even coverage.

5. Paint the white areas, allowing paint to dry in between coats. Apply paint until you have even coverage.

6. Apply glue to the pots and stack them together. Apply glue to the bottom of the lantern and the top of the clay pot lighthouse base. Attach lantern. Allow glue to dry completely.

7. If you don't use a solar lamp, add a LED candle to the lantern and enjoy your new lighthouse!